29 December 2013
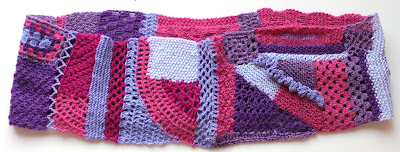
Freeform scarf
Freeform is one of my favourte techniques. You can mix many techniques, this is knitting and crochet. I began using freeform when I was still at school. The photo below was in a Finnish fashion and craft magazine in the late 70's. I took part in their competition.
The challenge in freeform is to create the work in such a way that the item stays flat and grows evenly. At the same time, it is easy to make corrections as they don't look like corrections! In the photo below the arrow points to a wedge that I added simply because the scarf had narrowed down.
I have used a number of different yarns but they are all wool or alpaca and of such weight that size 3.0 mm needles and hook were suitable.
More photos:
14 December 2013
Christmas tree memories
This year I bought a new Christmas tree. Here in Finland lots of people use real trees but they don't last as long as I want my tree to be up. Here many families only get the tree a couple of days before Christmas - for me that would be loosing so much of Christmas!
Many of the decorations bring back memories. This year there are even more of those. During the year we emptied my mother's home. My sister, brother and I divided the older decorations between us.
Mother had had this decoration before she was married in 1960 and I remember it from every Christmas in my childhood.
Either myself or my sister made this basket heart in the late 60's.
This is later - part of a large bow I made when my own children were small in the late 80's. I just love Christmas prints in fabrics!
There decorations also bring back memories. In the late 80's and early 90's in Ireland crafts were my work for part of the year. I have kept some of the decorations I sold at craft fairs. I loved the atmosphere in the Irish craft fairs! The one I loved best was yearly at the Argory gentry house (not a paid ad :)!) Maybe that was because it was also the one where I sold best!
Have a lovely Christmas time!
3 December 2013
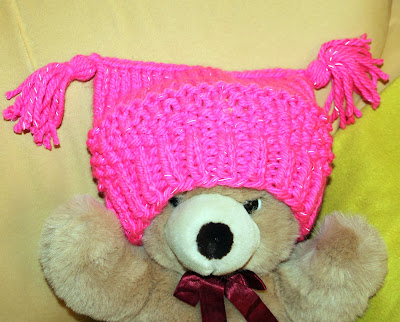
Chunky reflective child's hat
The hat will be one of the Christmas presents for my 4-year-old granddaughter Alessia. Here in Finland we only get light for a few hours each day now, so it is important to be seen! The yarn, Coats Schachermayr Lumio, has reflective strands in it. However, it is pointed out that this alone is not enough, you need ordinary reflectors as well.
A general explanation of hats of this kind. You can use any stitch patterns, colours, fairisle, crochet etc. for a hat of this shape because it is so easy: a rectangular piece sewn or knitted together at the top. Measure the head circumference and make the piece that is as wide as the circumference measurement. Sew it together in the middle in the back as well as at the top. Add tassels, pompons or whatever. (Or you make the same shape on the round using a circular needle.)
Instructions
Yarn and needles: super bulky, with knitting needles 10 mm (US 15). The yarn weight is 150 g - 75 m (5.3 oz - 82 yds).
Gauge: 8 stitches/10cm (8 stitches/4 inches). You could also make up yarn like this by knitting 2 or 3 lighter yarns at one go.
Child's size. The yarn is stretchy, fits about 3-10-year-old.
I have knitted it flat and there is a seam in the middle in the back. If you have a circular needle large enough, you can knit this in the round.
The hat is simply a rectangular piece.
Cast on 40 stitches.
Knit 1+1 rib for 6 rows. (knit 1, purl 1)
Row 7: knit
Rows 8-12: American seed stitch, British moss stitch. Knit 1, purl 1, next row purl on knit and the other way round.
Row 13: Knit
Row 14: Purl
Rows 14-24: Knit
Last row and casting off: Knit 10 stitches. Fold the work in two and take an etra needle. Cast off by taking one stitch from each needle.
After finishing the first half, divide the rest 20 stitches on two needles. Fold the work into two. Cast off the rest of the stitches.
Sew a seam in the back. Make tassels.
Labels:
children's clothes,
hats,
instructions,
knitting
1 December 2013
Chunky crochet blanket
To make this blanket I was able to use up loads of wool that I had gathered over the years and never needed. They are all at least 50% wool, most have more wool content than that. Yarns are different weights. Some are so chunky that I only crocheted with one yarn at the time, in other parts there are up to 4 yarns on the hook at the same time.
The zig-zag pattern comes from increasing and decreasing stitches. There are always 9 double crochet stitches in the straight bit. To create the point upwards you crochet 3 stitches into one stitch below. To get the point downwards make 3 double crochet stitches, leaving the last stitch on the hook and then crochet them together (decrease).You would find many instruction on Youtube on searches about chevron crochet, wave crochet or ripple crochet. This one has shart points.
The size of the blanket is 220 x 150 cm (87 x 59 inches). The stripes are vertical.
The blanket is incredibly warm, I love snuggling in it for a nap after work!
29 November 2013
Bling-bling socks for little girl
I love everything that is strong colours, shines or sparkles. I enjoy mixing ordinary yarns with bits of novelty yarns. Fortunately there is such a choice of those now!
These socks will be a Christmas present to my 4-year-old granddaughter. She loves sparkle even more than me!
This is a basic sock with some purl rows at the cuff to show off the yarns better. One 2+2 stitch cable on top of the foot.
28 November 2013
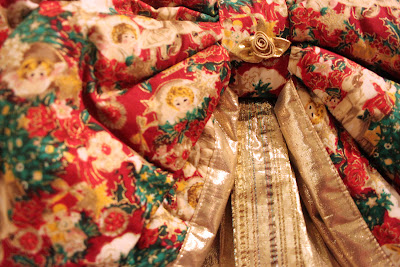
Advent calendar with pockets
This bell-shaped advent calendar is not new - in fact it has served for many years since I made it for my daughters who are now in their twenties. Various little items have been found in the pockets - hair baubles, little toys, pens, felt tips, craft items, occasionally also sweets. The bell also moved with our family many times, both in Ireland and in Finland.
The calendar has quilted fabric as backing to make is stiffer. It is 87 cm high (34 in). I tack it on a wall with 3 tiny nails.
The pockets and the bow at the top are made of various Christmas fabrics. The numbers are glitter glue.
This year the bell might be passed on to the next generation! That was already planned last year but we never got round to it.
25 November 2013
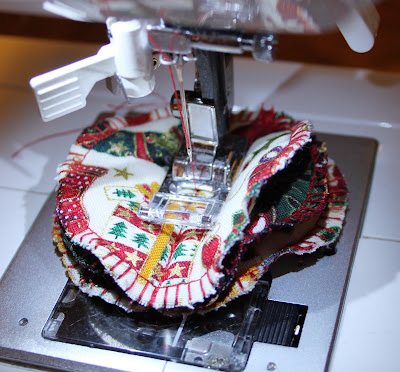
Christmas tree bauble of patchwork fabrics
At the end of 80's and early 90's I used to live in Ireland and work at crafts. Each year I spent several months making and selling Christmas decorations. I just loved it! This patchwork bauble was one of my most sold items. I hadn't made any for years now and felt very nostalgic making this one!
Unfortunately I didn't find the golden sewing thread I bought a couple of weeks ago. So had to sew this in red, but it isn't bad either!
Nowadays I knit and crochet far more than sew, so last Christmas time I made up a pattern to use this same idea in granny square baubles. The pattern is available free in Ravelry.
Size of the sewn bauble is 6,5 cm (2½ in). Here some photos of making it:
You need some wadding to put inside each part.
Quick to make, time to make many for Christmas!
21 November 2013
Mini Christmas stockings
Any small bits of left-over wool get in handy for these tiny Christmas stockings! I found lots of tapestry wool when going through my mother's things. Most of them came ready cut in lengths which makes quite a few ends to finish. But since these are decorations, not for use, I often just make a knot and cut the ends off!
Each stocking is 10 -11 cm high and has 16 stitches, knitted on 4+1 dpns. I will send these to family and friends instead of Chritmas cards.
More different kinds.
20 November 2013
Cable cowl
Made this cowl without any plans who it would be for. One of my daughters decided it was for her!
This photo shows the technique used:
The wool is Raggae tweed, with suggested needle size of 5-6 mm.The whole cowl is garter stitch.
35 stitches in groups of 7.
7 sts of garter sts - 7 sts for the cable - 7 sts of garter sts in the middle - 7 sts for the cable - 7 sts of garter sts. The "cables" are formed by platting together strips in the middle of the work. For each strip I cast off 7 sts and cast on 7 the next row at the same place. Each strip is 8 rows.
After you have knitted a length that goes twice around the neck (this one is 120 cm long), bind off. Twist the first strip so it forms a circle. Pull the next loop through it, as if crocheting with your fingers. Continue like this through all the strips. Then do the same with the second lot of strips. At the send, sew the cowl to form a cirlce. Sew the last cables so they don't come loose.
Colourful scarf in slipstitch crochet
I crocheted this scarf using mainly slip stitches where I took only the backof the previous row on the hook. Always crocheted from the same side (not turning the work). I wanted to make the scarf as varied as possible. Sometimes there is one yarn on the hook, other times 2 or 3.
A few times I used a single strand of weaving linen and single crochet. That shows as a sparser area in the scarf.
Photo of the back side of work - not so different that it matters if the scraf turns that way when worn:
Quick to make and a great way to use up stash!
A few times I used a single strand of weaving linen and single crochet. That shows as a sparser area in the scarf.
Photo of the back side of work - not so different that it matters if the scraf turns that way when worn:
Quick to make and a great way to use up stash!
Scarf in crazy wool
See the previous photos of the Crazy wool-course I attended. The last evening on the crazy wool course I made a scarf. Or part of it, finished it at home.
The scarf has 5 layers while it's being made: 1: water soluble fabric, 2: mix of yarns, ribbons and wool, 3: layer of organza, 4: mix of yarns, ribbons and wool, 5: water soluble fabric.
Layers pinned together while working.
After sewing I washed the panel so the water soluble fabric disappeared. Then I felted it slightly. Finally I cut away the extra organza.
Subscribe to:
Comments (Atom)


